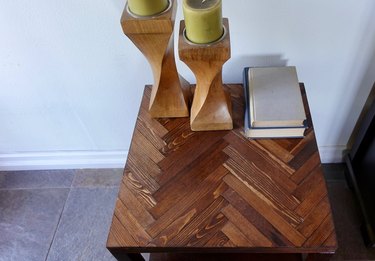
Feast your eyes on this beautiful herringbone pattern tabletop. Would you believe that this was created using paint stir sticks that cost (at the time of writing this) 98 cents per pack of 10? Heck, your local home improvement store might even give you as many paint sticks as you need for free if you're in there to buy paint anyway. Talk about cheap materials. And what about tools? Well, although power tools would definitely get the job done faster, with a bit of patience, you can finish this project with hand tools.
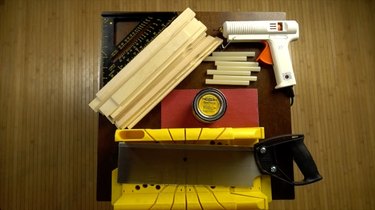
Things You’ll Need
-
Old table (if you're doing this manually, we recommend making over a smaller surface such as a side table or even a plant stand)
-
Paint stir sticks (any length)
-
Speed square
-
Pencil
-
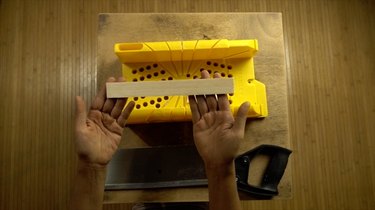
Miter box and hand saw
-
100 grit sandpaper/sanding block or power orbital sander
-
Wood glue sticks (not regular hot glue) and glue gun
-
Wood stain
-
Wood filler
-
Clear finish of your choice
-
Jigsaw or circular saw (optional, but nice to have if you're doing a larger surface!)
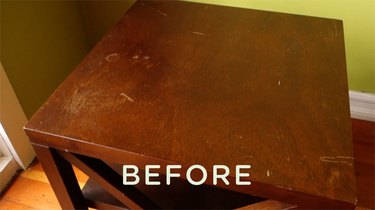
Before we start, here's a look at what my table looked like before. As you can see, it needed a bit of TLC.
Step 1
Sand the old tabletop to roughen it up in order for the glue to be able to adhere the sticks securely. No need to completely remove the old finish as you won't be refinishing this surface — you'll be simply gluing onto it. Remove all dust before proceeding.

Step 2
To create a herringbone pattern, you need rectangular pieces of precisely uniform dimensions. To achieve this, you'll have to remove the curved-edge portions of the stir stick (see below) but exactly how much you cut off depends on the final herringbone look you'd like to achieve.
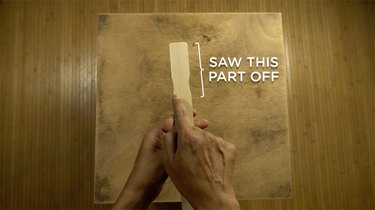
If there is a specific look that you're going for — for example, if you want shorter pieces and an exact number of pattern repetitions — you'll have to do the geometry to figure out the stick dimensions you'll need to achieve that look for your table. I went the easiest route and simply chose an arbitrary length. Regardless of the length you choose, you must cut the pieces to the same dimensions to the best of your ability with the tools you have. However, if there are slight variations which leave small gaps between a few of your pieces, you'll have the opportunity to fill these in with wood filler later on.
Tip
It's definitely a good idea to plan out your pattern first before cutting. Draw diagrams, or buy extra paint sticks to experiment laying out your herringbone pattern using different lengths of wood to get a good feel for how you'd like your finished table to look.
Step 3
Once your pieces have been cut and your design planned out, it's time to lay down your first two pieces. Before gluing, it's important that you precisely measure their placement, as the rest of your pattern will be laid down in relation to these first two.
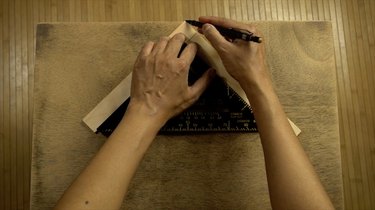
Place one corner of the first wood piece at the very edge of the table (where you'd like your first pattern row to begin) at a 45-degree angle from the edge (see image below). Use your speed square to guide you. I chose to place the corner of the first piece in the center for a somewhat symmetrical appearance.
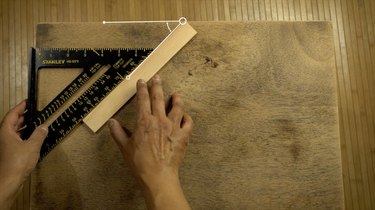
Mark this angle with a pencil.
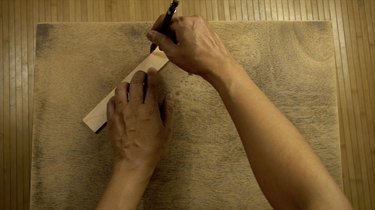
Place your second piece of wood at a 90-degree angle from the first piece of wood as shown below, with the top edge of the first piece lined up with the side edge of the second piece.
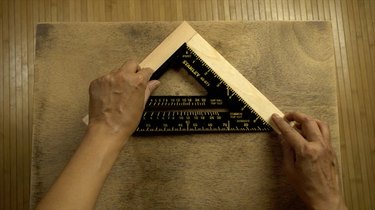
Mark this angle with a pencil. Of course, the angle opposite your first 45 degree angle should also be 45 degrees. (Your high school geometry class is paying off!)
Step 4
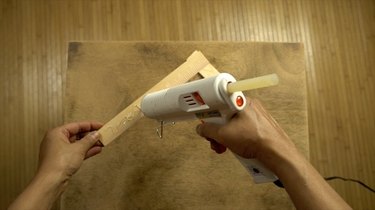
Glue down your first two pieces of wood using the lines you marked as a guide.
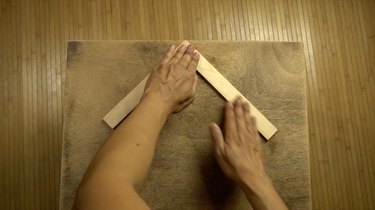
Continue gluing your first pattern row, guided by the pieces you initially laid.

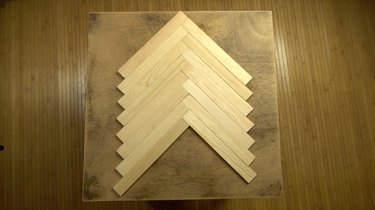
Keep gluing until you come to the point where you can no longer glue entire wood pieces onto your tabletop without having some extra overhang at the edges.
Step 5
There are a couple ways you can remove the excess wood, depending on the type of tools you're using as well as your own personal preference. You can either cut the pieces to fit before gluing them on, or glue the pieces down with the extra overhang and trim the edges off afterward.
Since I'm cutting my pieces manually with a miter box and saw, I chose to cut the pieces (roughly) to size before gluing them down. This allowed me to cut pieces more precisely so there was less sanding to do on the edges afterward. If you choose to use the other method (cutting the edges after gluing), refer to the tip box below this step.
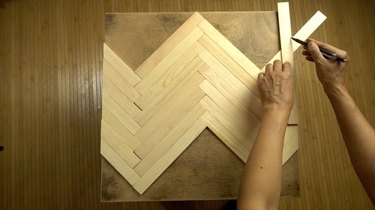
Place the next piece of wood down continuing the herringbone pattern.
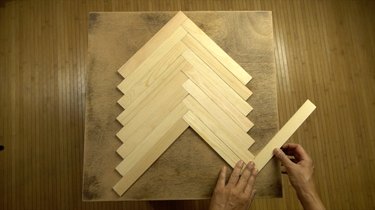
Use a straight edge to mark where the excess wood should be cut. Every piece that you cut will must be an accurate 45 degree angle, which is why using a miter box is a must.
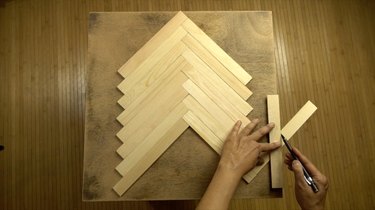
Cut the piece of wood to size. It's a good idea to err on the side of leaving a tiny bit of excess, as you can always sand it down. However, if you cut too much, you'll have to re-cut another piece.
Note that the parallel pieces along the edge you're working on (the right-hand edge, in the photo above) will be cut to the same dimensions, so if you have the capability of cutting multiple identical pieces at once, you should do so.
Tip
If you have a jigsaw or circular saw, you can opt to cut the excess wood at the edges all in once fell swoop. It's certainly much faster than cutting each piece to fit. However, note that power tools will easily splinter paint sticks (which are meant to be disposable, after all), giving you edges that aren't clean. If you go the power tool route, leave a bit of excess wood off the edges and then sand down the roughly cut edges to make them flush with the edges of the table. Alternatively, you can also use a hand saw (a razor saw would be particularly great for the job, if you're adept with one) to cut all the edges at once. Once you've glued all your pieces down and then cut the edges off, skip to Step 8.
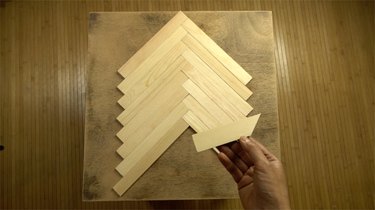
Step 6
After cutting your edge piece(s), glue in place.
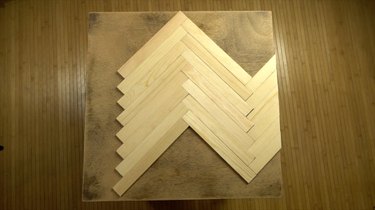
Step 7
Keep repeating steps 5 and 6 all the way around the edges.
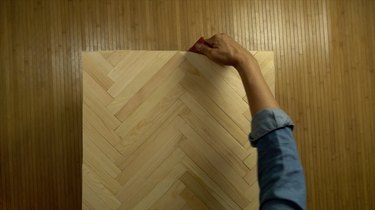
Step 8
Once all of your wood has been glued and cut to size, sand the edges for cleaner lines.
Step 9
Now it's time to fill in any gaps between your pieces with wood filler. Apply and let set as instructed by the manufacturer. You can skip this step if you were super precise and ALL of your pieces fit together perfectly. If so, impressive!

Step 10
Once the wood filler has set according to the product instructions, sand down the entire surface to remove excess filler and level the surface.

Step 11
Apply wood stain according to the instructions given by the product manufacturer. I used a single coat of a brush-on stain.

Step 12
Finally, protect your tabletop using the clear finish of your choice. Since this is a side table that won't get a whole lot of wear, I applied a couple coats of a semi-gloss polyurethane spray. If your table will get heavy-duty use, you should pick a more protective finish.

And there you have it. You've just DIYed yourself a brand new showroom-worthy herringbone tabletop!


We'd like to give credit to this inventive tutorial, which inspired and informed this fun paint stick project.

