 “Photo by WestbywestDCL
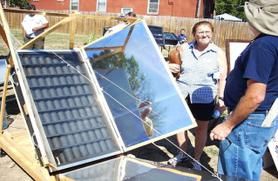
Passive Solar energy is great… it is free, clean, simple, and functional. Cansolair has been marketing a forced convection solar heater successfully for awhile now, and while the design is precise, ingenious, and effective, the very same device can be fashioned by your average do-it-yourselfer for just a few bucks. We are talking about a much smaller unit that would be designed to heat a 400 to 500 square foot two car garage/workshop.
Now, you may not be exactly be ready to suit up in your bathing suit once you get this heater put together and running, but it should be more than enough to take the chill out of any garage (but even more so in an insulated garage). It should be possible to increase the temperature of most any garage, anywhere from 10 degrees on up, just by making this rather simple homemade convection heater.
Now there are a number of ways to do this, with the fancy designs usually providing the best results, but we are going to explain the most simple and basic plan of attack. Then you savvy do-it-yourselfers can add on to this idea with your own ingenuity and make it even better.
Here’s What You Need:
4 lengths of 2 X 4 wood
1-2 sheet(s) of plywood (any thickness)
a lot of soda cans
flat black barbecue grill paint
low energy draw fan
temperature on/off sensor
Sheet of Plexiglas (or equivalent acrylic glass)
electric drill
1" to 1 1/2" hole cutter for drill
2" to 3" hole cutter
one roll (24" X 10′) reflective foil "double bubble" insulation
sand (optional)
Here’s What You Do:
Step One:
Build the basic box structure using the 2 X 4 wood as the frame, the plywood as the backing, and then the Plexiglas will be your front cover. The reason you use Plexiglas is to allow the sun to get full access to the aluminum cans which will be sealed inside the box. The cans will heat up, and produce a solar convection heating effect.
In order for this plan to work however, you are going to have to decide how big the unit is going to be, which subsequently will also decide how many soda cans you will need to finish the project. The bigger it is, the more heat you will produce. For 400 square feet, we would recommend no less than about a 4′ by 4′ box.
Measure the box out so that the can will fit within the box snug. Leave a little room for the insulation. You can use whatever non-toxic insulation you prefer, but I have always had good luck with 5/16" thick reflective "double bubble" foil insulation. It is inexpensive, easy to work with, very effective, non-toxic, and very thin.
Once the basic box design is complete, you will need to drill a hole (2" to 3", depending on the vent size you wish to use) in both the bottom and top. The bottom hole will be used for your cool air intake, this is also where your fan (w/ temperature control) should be installed. The top hole will be the exhaust vent where all the hot air will come from.
Once the box frame and intake and exhaust holes are complete, you will want to seal all the seams with a good all-weather caulk. Take extra time here as you do not want any of that valuable heat you are harnessing to escape. Now you can take whatever insulation material you chose and line the bottom and sides of the box with it.
Step Two:
Now you can gather up all your soda/beer cans and begin to cut a 1" to 1 1/2" hole in both the tops and bottoms using a drill. This will allow the air to circulate up through the cans. Once this is complete, fill a bath tub up with warn sudsy water and pour the cans in to soak for several hours. Once the cans seam reasonably clean you can take them out and allow them to air dry for a day or two.
Step Three:
Once the cans are dry, paint them with a flat black barbecue grill paint. You are using flat black because of its superior ability to gather heat. We chose barbecue paint because of its reasonable cost and its ability to withstand the heat in the box without flaking or peeling. In certain cases your box may see temperatures as high as the upper 100’s.
Once the paint is dry, you will need to stack the cans in rows on top of each other across your box and use the caulk once again to seal around the edges of each can so that each stack is practically air tight except for the bottom and top drilled openings.
Now you are ready to install the Plexiglas cover over the box frame and also seal it off with caulk.
Step Four:
To gain the most benefit out of this convection heater box, it will help to install a fan down near the lower cool air intake of the box. This will ensure that the hot air flows through the entire box effectively. Now since you don’t want to be blowing any cool air, it will behoove you to install a temperature adjustable on/off switch that will only circulate the air only when the box has reached a set warm temperature.
Step Five:
Now you can install the box on either your garage roof, wall, window, etc. Pick a place that will receive the greatest about of sun and angle it appropriately. Cut a hole in the garage exterior to support both the lower air intake, and the upper heat exhaust. Supply a hose to each, cover it with a vent, and seal it off from the weather.
Option:
Some people have chose to fill the soda cans with sand in order to retain the heat it has collected throughout the day to continue heating during the evening. While I have no personal experience with this particular idea, it would seem to theoretically make sense.

